By Tawny Bott - Abra-Cadabra Alpacas - Kiowa, CO
With editing notes by Ron Hinds.
A PDF of this is available here.
Published with permission here and in the Spring 2018 Journal. Thank you Tawny.
This is an ongoing project. It works quite well, but there can be many variations, changes and additions to the process. So be prepared to think 'outside-the-box'. if you see something that you could improve, try it!
So you have a bottle baby. How many of us dread the thought? Whether from losing the dam, a mom that just won’t accept her bundle of joy or one that doesn’t have enough milk; it is perhaps one of the biggest challenges the camelid owner has to deal with. Not only does it take a lot of time and effort to get in all the feedings needed to sustain life, but sleep is now a thing of the past. Zombies have nothing over an owner feeding an orphan cria. Yep, so many of us have been there.
For years I too was right there in the trenches, sleeping in short naps and hoping and praying I’d make it through until the baby could eat larger meals and start stretching out the feeding times. I mean even if you can put out a bottle in a holder or pour milk in a bucket, you still had to be there to put it out. I just assumed it was the way it had to be. But no more. Prepare to be amazed! Here comes a nifty little invention that can make both the owner and cria’s life a bit easier.
It started out several years ago when I took in a couple of refugees from the flood in Lyons, Colorado. Whether you heard about it or not, it was a massive flood that left animals and humans in deep water for days and sometimes weeks. Baby Shadeaux was having a rough time of it as his mom’s milk had dried up from all the stress and unfortunate living conditions. When I got him at 4 months of age, he was the size of my 1-month old crias and yet he would only drink 1 or 2 ounces of milk at a time. I tried all sorts of supplemental feeds, but he just wasn’t too interested in solid foods. Something had to give and even feeding him every four hours wasn’t getting him enough calories for him to grow on.
I came across a FB post by Julie Rosenfeld about making a feeding bucket. Well, I took the info provided and by making some changes and additions, produced a feeding station that allowed Shadeaux to drink whenever he felt like it, and it would work in any weather and finally, not only got me away from hourly feedings, but he began to gain weight! Today you’d never be able to tell he had such a rough start in life.
What you’ll need to make your own:
- 5-gallon bucket. I repurposed a leftover kitty litter bucket, but a round one from any home improvement store will do as well.
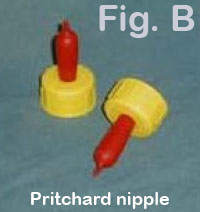
- Pritchard nipple (Fig. B)
- A length of clear tubing. ¼” diameter fits right inside the Pritchard nipple and needs to be approx. 18 inches long. The length you need will be determined by the size of the bucket and milk reservoir.
- ¼” inner diameter slotted electrical grommet for hole in lid, just large enough for the tubing to fit through. (but it will work fine without it.)
- A container for the milk with tight fitting lid. I used the plastic container that nuts or candy come in at the big box stores.
- Rigid insulation cut to fit in bottom of bucket. I recycled some extruded foam that was used as packing material from a previous package, but rigid, foil back house insulation will work as well.
- Five 1-gallon zip style plastic bags, stuffed with alpaca or llama fleece.
- Two or three 6 to 8 inch blue ice packets.
- And for winter use. 6 feet pipe heating tape
- Duct tape
- plastic wrap
- permanent marker
Tools used:
- A drill
- 1” to 1 ¼” hole drill bit or Forstner bit for hole in bucket
- 5/8” drill bit - for hole in lid of milk container
- Scissors or razor knife to cut off top of soda bottle
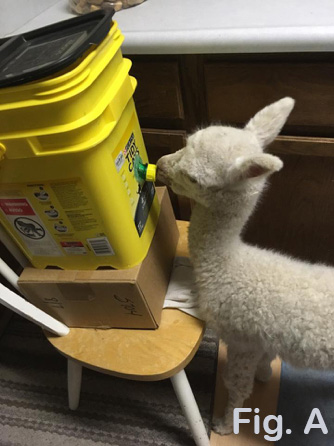
Shadeaux trying it out. It really didn't take long before he was happily using this anytime he wanted. First, I slowly, over several days, reduced temp of milk in his bottle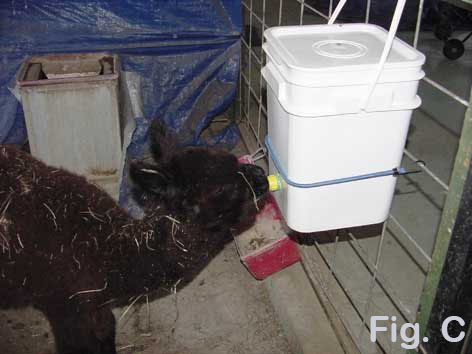 until I was feeding cold milk. Then I held the bucket like a bottle so he would get the idea his bottle was bigger. Then it got hung on the fence, (Some owners have also used a chair with boxes to lift it to the right height to start out) and I came out at normal times to make sure he'd come in to feed. Soon (less than 2 weeks) he was doing it all on his own and all I had to do was fill the milk jug, once or twice a day and of course give it a good scrubbing to keep it clean. FYI: pipe cleaners work really well for the tubing. I did eventually find a bigger container as he was emptying the smaller one too quickly.
Dr. Callan, CSU Veterinary Teaching Hospital, recommends even putting the milk reservoirs in the dishwasher between uses. Bacterial growth in the milk between reservoir changes is the greatest risk for health.
Another word of caution from Dr. Callan: There is the possibility of an animal over drinking milk and getting a clostridial enteritis but most nursing crias will self regulate their feeding.
Here is the feeder, set up ready to go. You’ll notice that on this original bucket, I had to adjust the nipple to a higher spot on the bucket; hence the extra capped off hole in the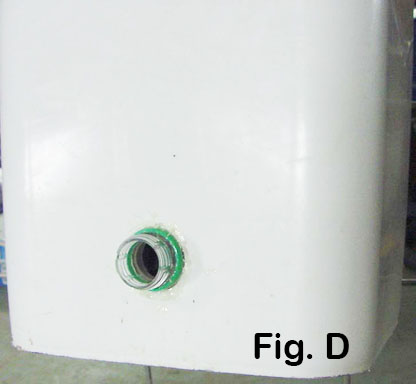 bucket. IMPORTANT: THIS IS THE ADJUSTMENT TO THE POSITION of the nipple I needed to make as the lower position (now a green cap) kept siphoning the milk onto the floor once the baby was done nursing. (See Fig. D) My barn cats thought this was awesome, but I wasn't too thrilled. I also shortened the flexible tubing, so he didn't have to suck so long to bring the milk to the nipple. So a shorter tube is better.
 First drill a hole large enough for the cut off end of a soda bottle to fit through. Make sure the bottle is one that fits the Pritchard nipple. (Again the hole shown is too low, see above) You can also cut a slightly larger hole and angle the bottle end down to approximately 20 degrees to better mimic the angle of mom’s teats. Glue it in place to the bucket. I used fast drying epoxy.
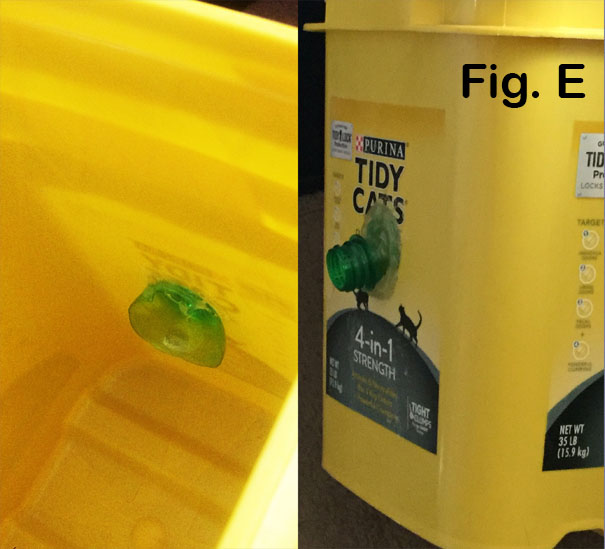
(Option: Cut a larger hole and cut the top 2" off a small soda bottle.See Fig. E. Slant the cap top down to make it easier for the cria to nurse and use a plastic glue gun to seal the bottle top inside in place.
Fig. F shows the thickness of the rigid foam I used for the bottom, I would say 1 inch is the minimum thickness to use. Set the bucket bottom down on the foam and trace around 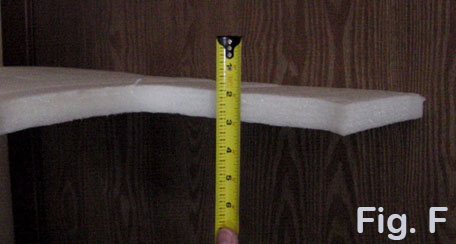 the outside. Cut the foam just a little smaller than the markings to make a good fit. I used a rigid insulation since I needed something solid to set the milk container on, yet still keep an insulation value on the bottom of the bucket to keep the milk cold. I also wrapped and taped the foam in plastic wrap, since milk will accidently spill, and you want to be able to occasionally wash it and not let the foam soak up the milk. Spoiled milk smell is not pleasant.
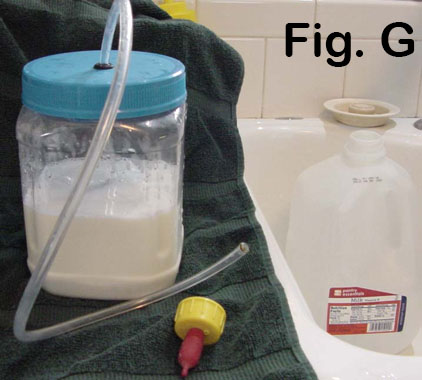
Here is the type of container I used for the milk. (Fig. G) The tube fits inside the red area of the Pritchard nipple. I did heat up the end of the tube to round the edges after it was cut to size.
Cut a hole in lid just large enough for the tube to fit through, or if you decide to put in a 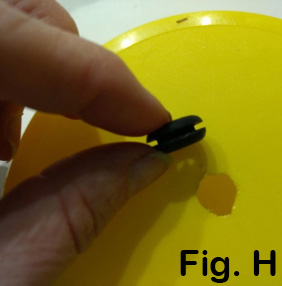 grommet (Fig. H) for tighter seal (less leaking of milk) and to protect tubing from scrapes, make the hole just large enough that the grommet can be pushed into place and still have a bit of the lid edge to catch into the indention of the grommet. I found a 5/8” drill bit was the right size. Smooth the edges of the hole with a sharp knife or
 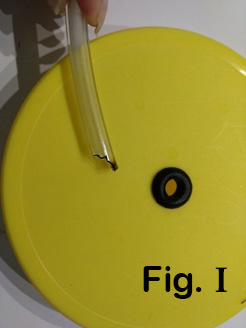 sandpaper. You can use duct tape instead of a Grommet.
Also note how I cut the end of the tubing (Fig. I) that goes into the jar. (black line added for definition) By making a small notch on each side of the slanted end, it still allows milk to be drawn up even if tube end has gotten pressed against the side or bottom.
Next measure the length of tubing you’ll need to go from the bottom of jar to the nipple. The tube is just placed into nipple using only pressure as a seal. Make sure the tube is placed at bottom of container when you measure and also when in use.
After placing the rigid insulation in the bottom of the bucket, place 4 of the gallon bags filled with fiber on each side or around the sides of the bucket.(Fig. J) 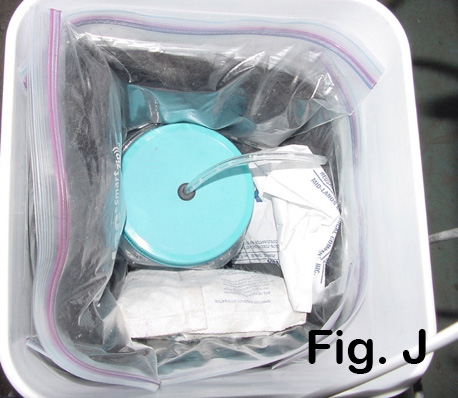 Put in the milk filled container with tube already placed through the lid. Find a spot over or between the bags to attach tubing through the soda top hole and into the nipple that is then screwed onto the soda bottle top. Place blue ice packets inside of fiber against the milk container. Baby sucking draws the milk up the tube and to the nipple.
Top with one more blue ice if you like and the last gallon bag of fiber. This has kept the milk cold and fresh for 48 hours in 70-degree temps, with blue ice still having solid crystals when I changed it out. One study places one inch of felted alpaca at an 94R insulation value, an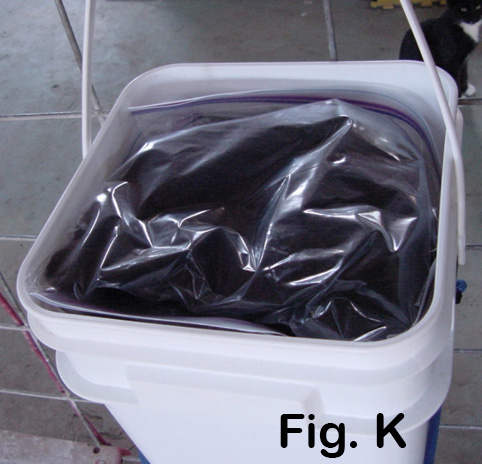 d it is also key to keep the milk from freezing when the temps began dipping into the 20's.
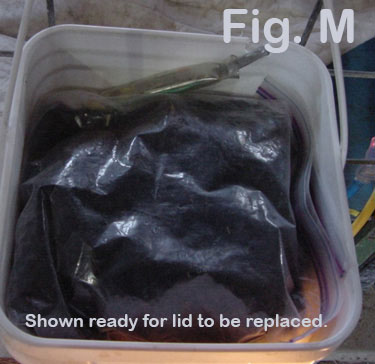
As we started going into the low 20s, I had to come up with something to keep the milk from freezing. (See Figs. L & M) So here is what worked. Running heat tape inside the bucket from bottom to top, BUT outside the alpaca fiber insulation. This allows the ice packs to still keep the milk fresh, but not going down to freezing.
I had to make sure the milk tubing was run 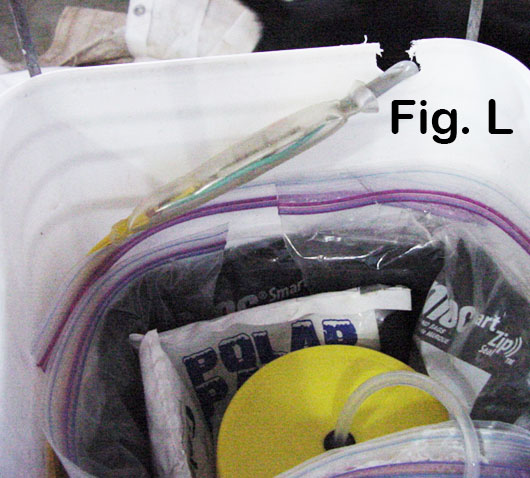 through and pretty much touching the heat tape both top and bottom as it went out to the nipple to keep it from freezing solid, especially as we went down to negative temps.
I made a cut out (Fig. L) for the cord to go through with the lid closed but kept the sensor inside the bucket but outside the fleece insulation.
The last challenge was how to keep the nipple from freezing up with residual milk when the temps got to 15 below. An incandescent light 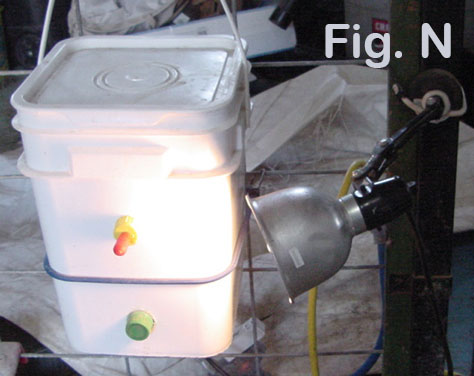 bulb (Fig. N) shining on it (I think this is a 75 watt) keeps it nice and thawed, and baby doesn't seem to mind too much. Put this light on a thermal cube sensor plug so it turns off if the temp goes above 45 degrees and turns back on when it gets to freezing.
This hasn’t only worked for me; many farms have tried it and found it to be an effective way to feed their bottle babies.
There are many things that you can dream up to improve the auto feeder:
One might be to create another hole in the lid of the jar for a small funnel so you can fill the jar without removing everything.
Creating a sealed jar to keep milk in the tube between feedings:
Each time the cria stops sucking the nipple he/she the milk in the tube would return to the jar. It would be better if the tubing remains full of milk when the cria is not sucking on the nipple. But it's also necessary to allow air into the jar to replace the milk. If not, it would create a partial vacuum in the jar, and no milk would flow until air flows from the nipple back into the jar.
The Pritchard nipple does have a hole in the cap that allows air to flow into the tube onto the jar. This would eliminte a vacuum but, again, would not keep milk in the tube.
The hole in the nipple is generally not large enough to allow milk to freely flow out of the nipple 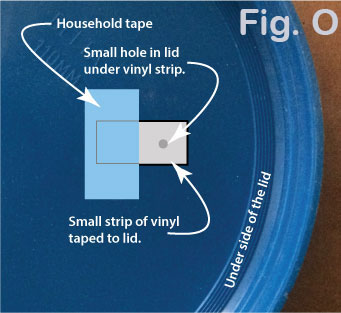 without suckling or air in the nipple when not suckling.
The solution is to seal the jar. It's important the tube through the lid is sealed with the grommet (Figs. H & I) and use the plastic glue gun to seal the air hole in the Pritchard nipple cap. To prevent a vacuum and allow air to freely flow into jar, use a small piece of vinyl and taped to the inside of the lid (see Figs. O & P). This would also prevent air inside the jar from escaping replacing the milk that will flow back into the jar in the tube. But would allow air to flow from the outside into the jar as the milk is consumed.
Instead of using a vinyl strip, you can try multiple layers of hosehold tape, folded so the sticky side is
on the inside.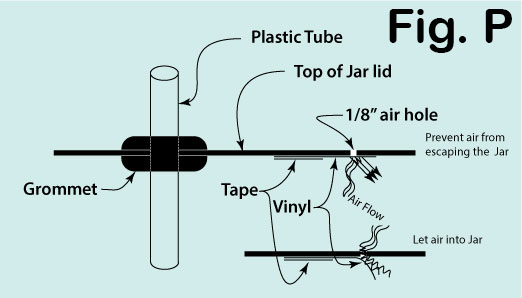
Then seal the bottle and test it by blowing and sucking on the tube.
Will need to keep the valve clean as sticky milk may prevent the valve from operating properly.